To test roof heating cables, look over the run from the ground, press the test button on the protected outlet, then switch the cable on during a cool morning and watch for an even warm line along the roof edge. Do it in fall, before freezing rain, so any fault is fixed while the roof is dry. Cable that stays cold, trips the breaker or looks damaged needs a pro, not tape.
How to test roof heating cables: the order that works
A good fall test has four parts, done in this order: a visual check with the power off, a test of the outlet protection, a short power-on run and a note of anything odd. Nothing in it needs a trip onto the roof, and none of it should involve one.
Timing matters in Ontario. Do the visual check in early fall while the weather is mild and the roof is dry. Do the power-on test after the eavestroughs are cleared of leaves, ahead of the first stretch of freezing nights. Freeze-thaw weather and freezing rain can arrive well before the first big snowfall, and a fault found on a dry day is far cheaper to fix than one found under a thick ice dam.
Two safety rules apply to every step. First, keep your feet on the ground. The test is designed so you can do it from a safe spot, using binoculars or a phone camera zoomed in. Second, look but do not touch the cable while it is powered. If something seems wrong, switch it off and ask for help.
Makers commonly add one more rule. Do not energize a cable that is coiled up in a garage or lying in a heap to see if it "works". Heat has nowhere to go in a coil. Test it laid out as installed, unless the manual says otherwise.
Step one: look it over from the ground with the power off
Turn the cable off at the switch or unplug it first. Then walk the full run and look for the following.
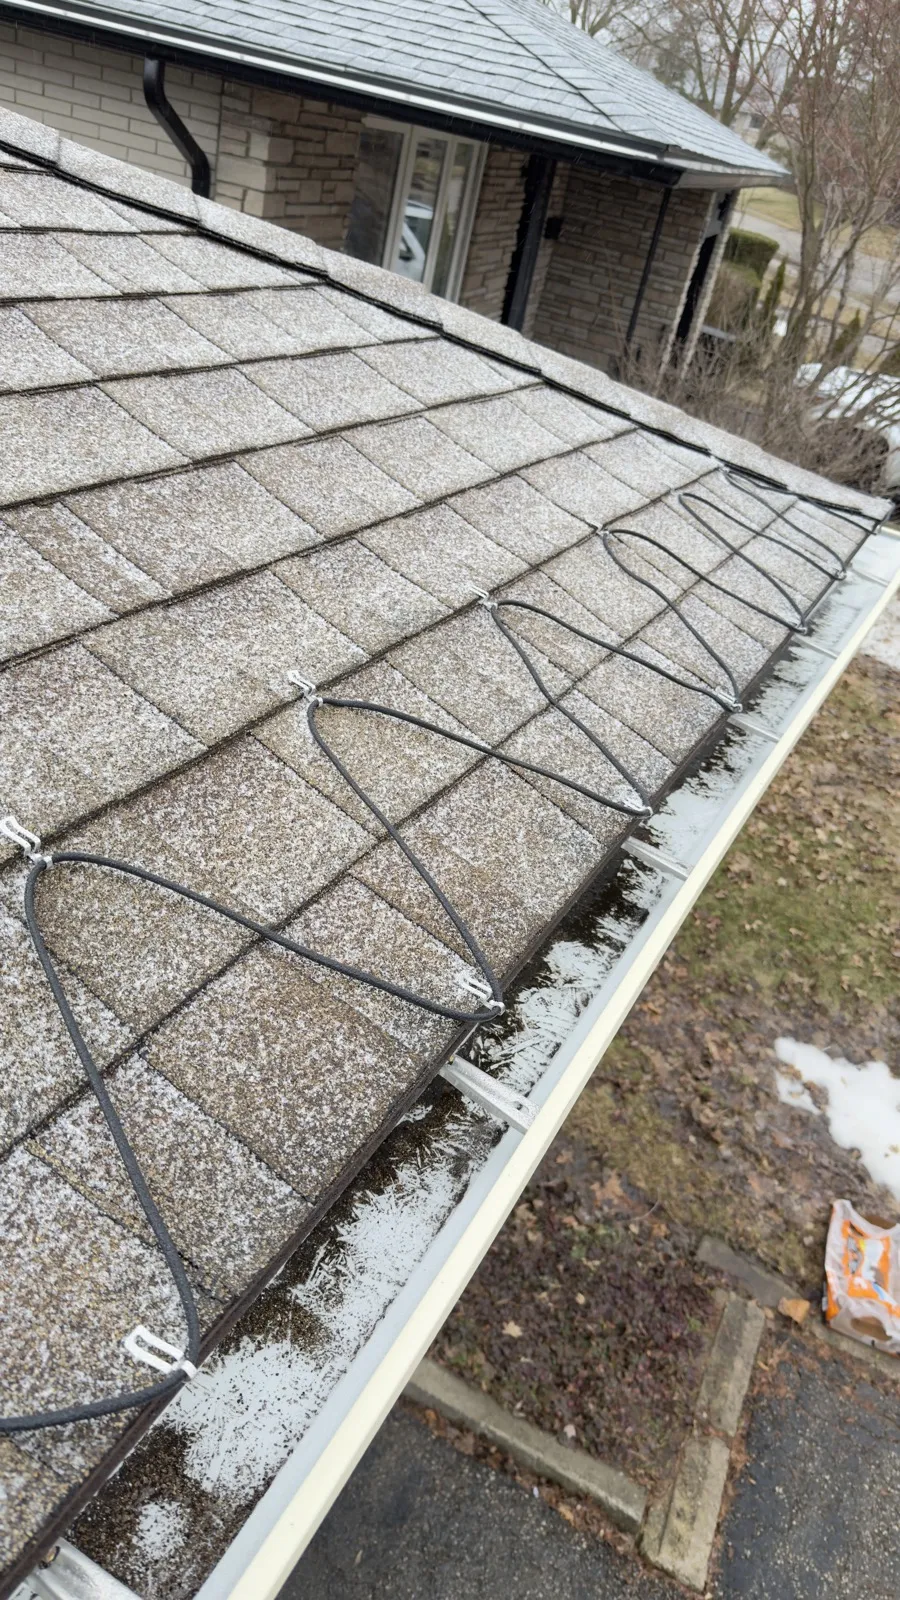
- Sagging or loose cable. Cable should sit in its clips along the edge, not hang in loops or lie on the shingles.
- Cable out of the eavestrough or downspout. Wind, ice and old clips can pull it out of the channel it was meant to keep open.
- Cuts, cracks, crushed spots, bare wire or discoloured patches on the outer jacket.
- Cable touching or crossing itself. The National Research Council Canada warns in an archived building digest that twisted, overlapping cable can melt its insulation and short-circuit.
- Debris. Leaves and silt in the eavestrough hold water against the cable and block the path. Clear them.
- The plug, the power connection and the cord. Look for cracks, melted plastic, scorch marks, loose fit or a cover that no longer closes. The Electrical Safety Authority (ESA) tells homeowners to inspect cords before use and warns that damaged ones can cause shock or fire.
Anything on this list that is damaged, scorched or crossed is a reason to stop and not to power up. The National Research Council Canada digest also advises frequent checking of these installations for safe operation, so make this look part of your fall routine.
Step two: test the outlet protection
The ESA recommends ground fault circuit interrupters (GFCIs) on outdoor outlets, with weatherproof covers to keep moisture out. If your cable is plugged in, press the test button on the outlet or plug-in GFCI. It should trip, which cuts the power. Press reset and it should hold.
- It will not trip when tested: the device is faulty. Do not use the circuit. Have it replaced.
- It will not reset: leave the cable unplugged and have the circuit checked.
- The cover does not close, or the outlet is cracked: fix this before plugging anything in.
If your cable is wired in with its own breaker or control, the same idea applies, but the protection is part of the installation. Ask whoever installed it what type of protection it has and how to test it. If you do not know, have a Licensed Electrical Contractor look at the setup. Wiring and protection beyond a plug-in outlet is not a homeowner job.
Step three: the power-on test
Choose a cool, dry, preferably frosty morning. Self-regulating cable puts out little heat in mild air, so a cold cable on a warm afternoon proves nothing.
- Clear a clean view. Stand where you can see the whole run without climbing.
- Switch on. Use the plug, or the control's manual-on or test setting. Your control's manual explains how to trigger a test, so follow it instead of improvising. If you use a moisture and temperature sensor, check that the sensor is clear of leaves.
- Wait. Give it the time the manual states. If it says nothing, allow 15 to 20 minutes.
- Watch the roof edge. On a frosty morning, frost or a skim of ice should start to melt along the cable line. A handheld infrared thermometer from the ground can also show a warm line against a cold edge.
- Switch off unless you want it on for a storm.
What good looks like: the warmth appears all along the run, in the eavestrough and down the downspout, with no bare or cold gaps and no scorch smell. What bad looks like: nothing warms, only part of the run warms, the breaker trips, or the cable smells hot. If any of those happen, switch off and use the table below.
Common faults and who should fix them
| What you see | Likely cause | Next step |
|---|---|---|
| Nothing warms; the GFCI is not tripped | Switch off, control setting, sensor or loose plug; or a break in the cable | Check the switch, control settings and plug. If still cold, call the installer |
| The GFCI or breaker trips at once or keeps tripping | Moisture in a connection, damaged cable or a ground fault | Stop resetting it. Switch off and call a Licensed Electrical Contractor or the installer |
| Part of the run is warm, part is cold | A break, a failed splice or end seal, or a poor connection | Switch off. The installer should check it |
| Burning smell, melted jacket or scorch marks | Overheating from damage, overlap or an overloaded circuit | Switch off at the breaker. Do not use until checked |
| Cracked, cut or bare cable | Age, ice damage or a bad clip | Replace the damaged cable. Do not wrap it in tape |
| Cable crossing or bunched | A layout fault | Have it re-laid to the maker's layout |
A homeowner can check the plug, the switch, the control setting and the sensor. The rest needs a person with the right testing tools. An installer or electrician can check the cable's continuity, its insulation and the current it draws, and compare them with the figures on the label. The ESA states that the only sure way to have electrical work done safely and legally is to hire a Licensed Electrical Contractor.
Can roof heating cables touch each other, and can you splice them?
Touching. Plan for no. Constant-wattage cable must never touch or cross itself, because it cannot ease off where heat builds up. A few self-regulating cables are permitted by their makers to cross in set places, but that is the maker's rule, not a general one. If your manual does not say so, treat any crossing as a fault.
Repair and splicing. Makers generally say not to repair damaged cable, and a taped or twisted join is a common cause of wet connections and shorts. Where a splice or an end termination is allowed, it is made with the maker's own approved kit, exactly as the instructions say, and a pro should do it. If a cable is cut, scorched or cracked, the safe answer is to replace that cable. Our post on repairing or replacing heated wires helps you decide.
The test also gives you a chance to check yearly upkeep. Our guide to maintaining heated wires after installation covers what to do through the season.
Does heat tape go bad, and when should it be replaced?
Yes. Cable jackets age, clips loosen and connections wear. There is no honest single replacement date, because exposure, damage and care vary from roof to roof. Replace on condition, not on the calendar: when the cable fails the fall test, shows cracks or bare spots, trips protection for no clear reason, or stays cold in a stretch where it used to melt ice.
The maker's literature and warranty state what to expect, and our guide to how long heated wires last in Ontario covers the factors that shorten it. A yearly test is a simple way to catch wear early.
If you would rather not do any of this yourself, D&D's roof and gutter heating cable service can look at an existing system, and the free written estimate states who handles the electrical part.
Roof heating cable testing questions
Can roof heating cables touch each other?
Not unless your maker says so. Constant-wattage cable must never touch or cross itself because heat builds up at the overlap. Some self-regulating cable may cross in set places, and the manual says where. If it does not mention crossing, treat any touching or bunched cable as a layout fault.
How often should roof heat tape be replaced?
There is no fixed interval. Replace it when it fails a fall test, shows cracks, cuts or bare wire, trips protection repeatedly or stops warming a stretch. Heat tape does go bad over time, so check it every fall. The maker's warranty and manual state what to expect for your product.
Can I repair or splice roof heating cable myself?
Makers generally say not to repair damaged cable. A taped or twisted join can let in water and short out. Where a splice or end seal is allowed, it uses the maker's approved kit, installed exactly to the instructions. For a cut or scorched cable, replacement is the safer route, done by an installer or electrician.
What if my roof heating cable does not heat when I test it?
First check the switch, control setting, sensor and that the plug is seated and the outlet has power. Then confirm the weather: self-regulating cable gives little heat in mild air. If it stays cold on a cold morning, or the protection trips, switch it off and call the installer or a Licensed Electrical Contractor.
Ready for a Reliable Winter Season?
D&D Snow Services covers Kitchener, Waterloo, Cambridge, Guelph and surrounding region.
Get a Free Snow QuoteKey Takeaways
- Test in fall in this order: look from the ground with power off, test the outlet protection, run it on a cool morning, then note any faults.
- Never climb to inspect cable, and never energize cable coiled up or in a heap.
- A tripped GFCI that keeps tripping means stop and call a pro. Do not keep resetting it.
- Damaged cable is replaced, not taped, and splices use the maker's approved kit.
- Heat tape has no fixed lifespan, so replace it on condition after a yearly test.
Sources & References
Request snow-service details
Identify the clearing areas, access priorities and seasonal or per-visit needs.
Prefer to send the details first? Request a quote or call (519) 501-5003.